
3 Ways to Apply Acrylic Nails at Home- Step by Step W/Video
Applying acrylic nails by yourself can seem daunting, but with the right guide and enough practice, you can easily create amazing and durable acrylic nails right from home.
That’s why in this article I am going to guide you through step-by-step how to easily DIY acrylic nails at home.
Now, there are 3 main ways you can apply acrylic nails, you can:
- Use glue on plastic nail tips to build out the acrylic extension.
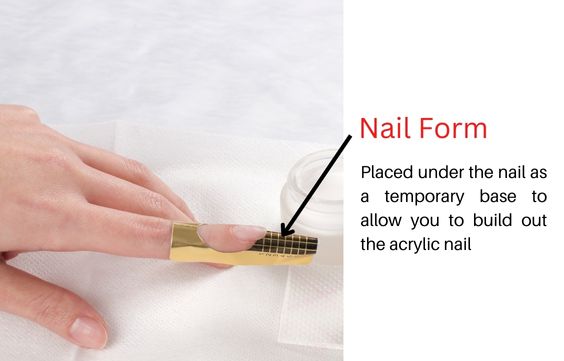
- Use paper nail forms as a temporary platform to build out the extension.
- Apply it directly onto your natural nails as an overlay. If you are interested in how to do an acrylic overlay click here.
Things You Need to Do Acrylic Nails
- Liquid Monomer – this is the liquid that you damp your brush with to pick up the powder. Click here to learn more about liquid monomer.
- Powder Polymer – this is the powder that forms the acrylic nail.
- Either Nail Forms or Nail Tips – to build out the nail extension. Not needed if you are doing an acrylic overlay.
- Acrylic Nail Brush – I highly recommend a size 8 oval shaped for beginners, click here to learn more.
- Nail Primers & Dehydrators – applied before application of acrylic nails. Helps to prevent lifting, click here to learn more.
- Nail File & Cuticle Pusher – Used to Prep Nails.
- Nail File – you are gonna need a medium-grit and a fine-grit nail file
- Rubbing alcohol or acetone to clean the nails
If you are a beginner to acrylic nails then I highly recommend you check out my article – 6 Beginner Tips to Make Acrylic Nails Easier to Apply
Recommended Acrylic Kit
Modelones has a really nice acrylic kit, that comes with high-quality acrylic products at a decent price making them perfect for beginners.
It comes with acrylic powder, liquid, an acrylic brush, paper forms,
The only thing they don’t include is a nail primer and dehydrator but you can easily buy that separately.
You can click here to see the price for the Modelones Acrylic Kit on Amazon.
1- How to Apply Acrylic Nails Using Plastic Nail Tips
If you are a beginner to acrylic application, then I recommend starting off by learning how to apply acrylic nails using plastic nail tips.
Plastic nail tips are glued onto your nails using nail glue and then acrylic is applied on top of it. Now since the tips are glued on, they tend to allow you to work with more confidence that it won’t fall off.
When I just started applying acrylic nails, I found nail tips to be easier to use but this will vary with everyone since some people find the tips harder to glue on and work with.
Step 1 – Prep Your Nails
Start by washing your nails with soap and warm water. This cleans your hands, and nails and softens up your cuticles.
Then use a cuticle pusher to gently push back your cuticles.
Next, use a medium grit nail file to buff away the sheen from your nails. This removes the oily layer over your nails allowing the acrylic to adhere better.
Finally, wash your nails with soap and water. Then wipe them down with a cotton pad soaked in rubbing alcohol or acetone.
Video Showing How to Prep Nails for Acrylic Application
Step 2 – Fit the Nail Tip
Once your nails have been prepped, you must put the nail tip on.
First, choose the correct size of the nail tip, ensure you choose one that is not too wide or too thin. If needed you can file the sides down to get a perfect fit.
Apply a little nail glue on the edge of the nail tip and then fit the nail tip onto your nails. You need to act fast before the glue dries.
Finally, use a scissor to trim the nail tip to the size and shape you want.
Also, I always buff the plastic tips to remove the sheen and then try to file down the area where the nail tip fits on the nails to give a nice smooth look.
Finally, wipe your nails down with a cotton pad soaked in rubbing alcohol or acetone.
Video Showing How to Fit Nail Tips
Step 3 – Apply the Nail Primer & Dehydrator
Both nail primers and dehydrators are used to prevent premature lifting. Primers work to bond the acrylic onto the nails whilst dehydrators remove moisture and oil from the nail plate.
- First, apply a coat of the dehydrator to your nails and let them dry for 10 seconds.
- Next, apply a coat of the nail primer onto your nails.
Only apply the dehydrator and primer onto your nail plate not onto the plastic nail tips.
You can click here to read my recommended brands of Nail Primers and Dehydrators.
Step 4 – Make the Acrylic Bead.
The next step for acrylic application is to make the acrylic bead. The key to making good acrylic beads is to get the right liquid-to-powder ratio.
- First, you need to wet your acrylic nail brush with the liquid monomer,
- Then simply dip the brush into the acrylic liquid.
- Next, take the damp brush and gently press it onto the acrylic powder.
- Avoid dragging the brush on the powder,
- Just simply press the brush down and then pick up the powder.
- The bead needs to be not too dry or too wet.
- You can check out the video below to see how it’s done.
Once you have made your acrylic bead you have about 1 minute before the bead hardens.
Step 5 – Apply the Acrylic Bead to the Nails
Once you have your acrylic bead, you can proceed to apply it over your nails. Take your time and gently apply and mold the acrylic over your nails and the plastic nail tip.
One bead might not be enough so you can use as many beads as needed, and I recommend for beginners try using small beads to build out the nail.
Also, you probably won’t get the exact shape during the application of the acrylic. But that’s ok because, in the next step, you will shape the nails to your liking.
Once you have applied the acrylic to the nails, you need to leave them to dry and harden for around 10 minutes.
Related Article – Dangers & Effects of Acrylic Nails- Can it Cause Cancer
Step 6 – Buff & Shape Acrylic Nails
Now once the acrylic has been applied and has hardened you need to shape the nails.
- First, take a medium grit (180 grit) nail file and then file the edges of the nails into the shape that you want.
- Next, take the file and then use it to buff the top of the nails to remove any excess bulk and make it into a more consistent shape.
- Finally, use a high-grit nail file 400-600 grit to buff the nail to make it very smooth.
Finally, once your acrylic nails have been filed apply any nail product like nail polish onto them.
Also, filing is very important, you can check out the video below for a full guide on how to apply acrylic nails.
Video of How to Apply Acrylic Nails with Nail Tips
2- How to Apply Acrylic Nails Using Nail Forms
Nail forms are where a paper structure is temporarily placed under the nails giving you a temporary structure to build out your acrylic extension.
Nail forms require less work and are probably the most durable and long-lasting way to apply your acrylic nails. This is because the acrylic is allowed to bond completely with the natural nails.
Unlike nail tips where the tips adhere to the nails by using nail glue which is more prone to lifting.
But nail forms also, are a bit more difficult since the paper isn’t so fixed onto the nails so it can come off if you don’t know what you are doing. But once you get the hang of it forms are much better than nail tips.
How to Apply Acrylic Nails Using Nail Forms
- First, prep your nails by pushing back your cuticles and then filing them to remove the sheen with a medium grit nail file.
- Next, wipe the nails with a cotton pad soaked with rubbing alcohol or acetone.
- Then apply a coat of the dehydrator and then a coat of the nail primer.
- You can then fit the nail form under the nails, check the video below to see how it’s done.
- Next, make the bead by dipping the acrylic brush into the liquid monomer and then into the powder
- Take the bead and start to build out the acrylic nail.
- Once the acrylic nails are dried and hardened, remove the nail form.
- Then you can use a medium grit nail file to shape the edges and remove any bulk on top of the nails.
- Finally, use a fine grit nail file to buff your acrylic nails as smoothly as possible.
- Now you can apply any nail product like nail polish onto your acrylic nails.
I have a video below that will guide you through how to apply acrylic nails using nail forms.
Video of How to Apply Acrylic Nails Using Nail Forms
3- How to Apply Acrylic Nails without Nail Tips or Forms
Now if you don’t want to extend your nails but still want a durable and long-lasting manicure, then you can just apply the acrylic onto the natural nails.
This is called an acrylic overlay and is usually used to reinforce the natural nails. I have an entire article on Acrylic Overlay where I will guide you on the Benefits & How to DIY it, click here to read it.
Or you can also check out the video below to learn more.