
How to Use Nail Stencils to Easily Make Amazing Nail Art
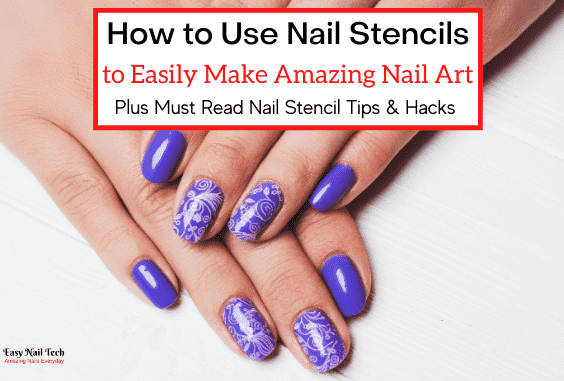
Using nail stencils are an easy and simple way to make amazing nail art without having to spend a lot of time and money at a nail salon.
And the great thing about nail stenciling is that it is very affordable and doesn’t require you to have any artistic skills.
Now in the article I am gonna guide you step by step on how to use nail stencils to easily make nail art. And also share with you some tips and hacks to get your stenciling more consistent and accurate.
How to Use Nail Stencils
- The first thing you are gonna need to do is to apply a base coat over your nails and allow them to dry.
- Secondly, apply a solid layer of nail polish onto your nails (A color of your choosing).
- Now, if you have one it’s advisable that you apply a fast drying top coat.
- And once the polish has dried you can then place your nail stencils over your nails.
- Ensure that you smooth down the stencil so that it fits completely flat on the nail.
- Next, apply a different color of nail polish over your entire nail including over the nail stencil.
- To apply the polish you can use a regular nail polish brush or you can use a makeup sponge.
- For very intricate designs you tend to get better results with the sponge
- The polish will only cover the gaps left on the stencil which will add the design to your nails.
- Finally, slowly remove the stencil with a tweezer and then apply a top coat.
- Pro-Tip: You need to remove the stencil before the polish has dried.
- For step by step instruction you can check out the video below.
Video On How to Use Nail Stencils
Recommended Nail Stencils
Whats Up Nails have a great 4 sheet variety pack that comes with designs such as hibiscus flowers, anchors, palm trees, and butterflies. Now they are a premium brand since they are made in the USA, so their stencils tend to be more pricey.
You can click here to see the price for a packet of Whats Up Nail Stencils on Amazon.![]()
Eboot also has a great and affordable nail stencil set, you can click here to see the price for a variety pack with 24 sheets![]()
Tips When Using Nail Stencils
1- Always Use Tweezers
When working with stencils it’s always best to use a tweezer to peel off the stencil for the sheet and to apply and take off the stencil from your nails.
You see tweezers will allow you to be more accurate and for you to maneuver easier which would avoid mistakes from happening.
Plus you will avoid getting oil and moisture from your fingers onto the stencil.
2- Ensure your Base Nail Polish has Dried before Applying the Stencil
Before you apply the stencil you need to ensure that your base nail polish is completely dried. You see if the polish isn’t dried properly when you remove the stencil the polish can peel off with the stencil as well.
3- Use a Fast Drying Top Coat Before Applying the Stencil
It’s highly advisable that you use a fast drying top coat over your base color before you apply the stencil. The fast drying top coat will prevent the base color from peeling when you remove the stencil.
Also to make your design more durable you should always apply a top coat over your completed nail art.
4- Smooth Out the Stencil on Your Nails Before Applying the Polish
You need to ensure that the nail stencil is completely flat on the nails before applying your nail polish. This is to ensure that the polish doesn’t seep under the stencil which would ruin the design.
So use a tweezer or cuticle stick to smooth down the stencil, do not use your fingers which would leave oil and moisture on the nails.
5- Don’t wait for the Nail Polish To Dry Before Removing the Stencil
A lot of people think that you have to wait until the nail polish is dried before removing the nail stencil but this is completely wrong.
You see if you do this the stencil will be much harder to remove and can even ruin the design. This is because the polish will harden around the stencil and act like glue holding it to the nail and when you do remove the stencil the polish will cling onto it.
So when you apply the last coat of polish you need to slowly and carefully remove the nail stencil before the polish has dried.
6- Use A Makeup Sponge For Very Intricate Designs
If you are struggling to get very intricate designs using a nail polish brush, you can try to use a makeup sponge to apply the polish over the nail stencils.
But you need to allow the polish to dry a bit on the sponge before sponging the polish on.
Or if you don’t have a sponge you can also apply very thin coats of polish over the stencils.
You see what happens is that when you apply a thick coat of polish onto the stencil the polish accumulates in some areas and can even seep under the stencil which would ruin the design.
7- Use Contrasting Color for Best Effect
Nail Stencil designs look best when they are paired with two contrasting colors. Most colors work best with a white background. So you can use white nail polish and then use almost any other color to stencil the design on.